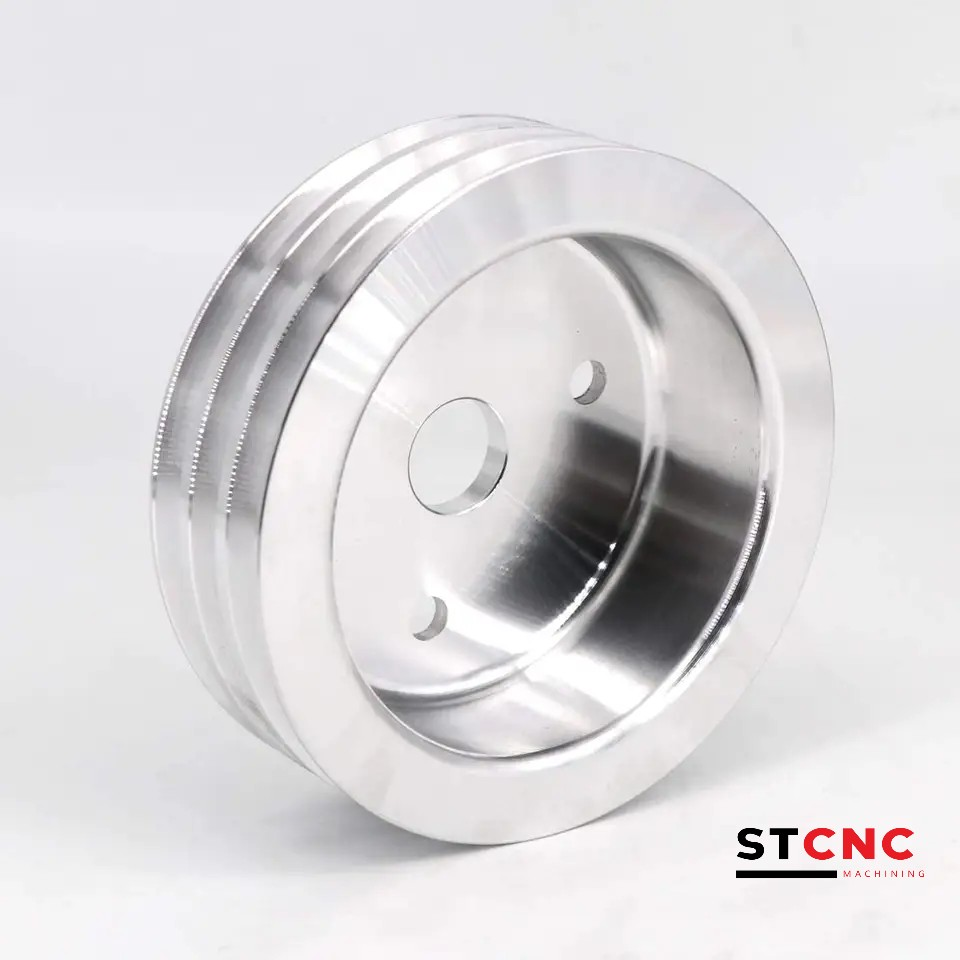
CNC machining is a widely used manufacturing process that allows for precise and accurate production of complex parts. Understanding tolerance standards is crucial to using CNC machined parts and machining processes. Tolerance refers to the allowable variation in dimensions, ensuring that the final product meets the required specifications. This article will explore the basics of tolerance standards in CNC machining, their importance, and commonly used tolerance levels and classes. So, let’s dive in!
What are Machining Tolerances?
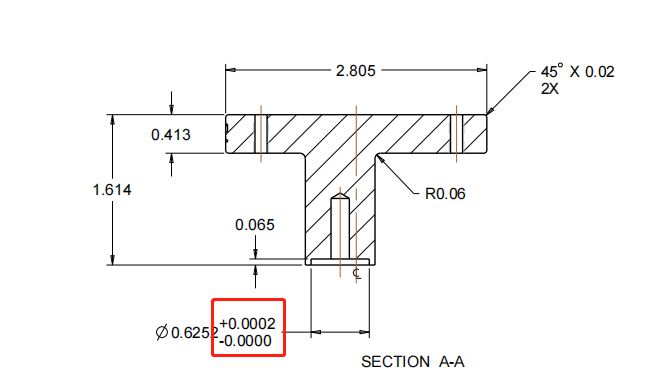
In machining process, tolerance refers to the allowable variation from a part’s intended dimensions or specifications. It represents the acceptable range of deviation that the actual measurements can have.
For example, if a machined part has a dimension of 50 millimeters with a tolerance of ±0.1 millimeters, the acceptable range of dimensions would be from 49.9 to 50.1 millimeters. Any measurement within this range is considered within tolerance, while measures outside this range would be considered out of tolerance.
Why Are Tolerances So Important?
1. Dimensional accuracy: Tolerances ensure machined parts meet specific size requirements accurately.
2. Fit and assembly: Tolerances ensure proper fit and compatibility between machined parts, reducing gaps or interference.
3. Interchangeability: Tolerances allow for the production of interchangeable parts that can be easily replaced or used in different assemblies.
4. Surface finish: Tolerances control surface roughness and texture variations, which is important for functional and aesthetic reasons.
5. Tooling and process: Tolerances guide the selection of cutting tools and machining processes, optimizing efficiency.
6. Cost optimization: Balancing tolerances with cost considerations helps achieve the desired quality at an optimal price point.
Tolerance Types
1. Standard Tolerances
Standard machining tolerances refer to the commonly used and widely accepted allowable variations in dimensions and specifications for machined parts. These tolerances are typically applied to general engineering applications and represent a balance between precision and cost-effectiveness. E.g., A machined part has a specified dimension of 25 millimeters with a standard tolerance of ±0.2 millimeters. This means that the acceptable range for this dimension is from 24.8 to 25.2 millimeters.
2. Bilateral Tolerances
Bilateral tolerances specify the allowable deviation from the nominal dimension on both sides of the target value. In other words, the tolerance range extends equally in the positive and negative directions from the desired dimension. E.g., A shaft’s diameter is 10 millimeters with a bilateral tolerance of ±0.05 millimeters. The allowable range for the shaft’s diameter is 9.95 to 10.05 millimeters.
3. Geometric Dimensioning and Tolerancing (GD&T)
GD&T is a system of symbols, rules, and definitions used to specify and control the form, orientation, and location of features on a machined part. GD&T allows for more precise and comprehensive tolerancing of geometric characteristics, providing a more transparent communication of design requirements. E.g., A drawing specifies the position of a hole relative to other features using GD&T symbols. The positional tolerance is 0.1 millimeters, indicating that the center of the hole must be within a cylindrical tolerance zone of 0.1 millimeters in diameter.
4. Unilateral Tolerances
Unilateral tolerances are where the allowable deviation is specified on only one side of the nominal dimension. This means the tolerance range extends in one direction from the target value, with no tolerance on the other side.
5. Limit Tolerances
Limit tolerances define the upper and lower limits of acceptable deviation from the nominal dimension. Instead of specifying a numerical tolerance range, limit tolerances set specific maximum and minimum values for the allowable variation.
Each type of tolerance serves a specific purpose and is used depending on the machined parts’ design requirements, manufacturing processes, and desired precision. Understanding and applying the appropriate tolerance type ensures the final product’s quality, functionality, and compatibility.
Tolerance Grades
1. International Tolerance Grades (IT Grades)
International Tolerance Grades, often called IT Grades, are part of the ISO 286 standard for specifying tolerances on linear dimensions. IT Grades are denoted by combining a letter symbol and a numerical value. The letter symbol represents the tolerance position relative to the basic size, and the numerical value indicates the size of the tolerance zone. The IT Grades specify the allowable deviation from the nominal dimension for machined parts.
The ISO IT Grades are as follows:
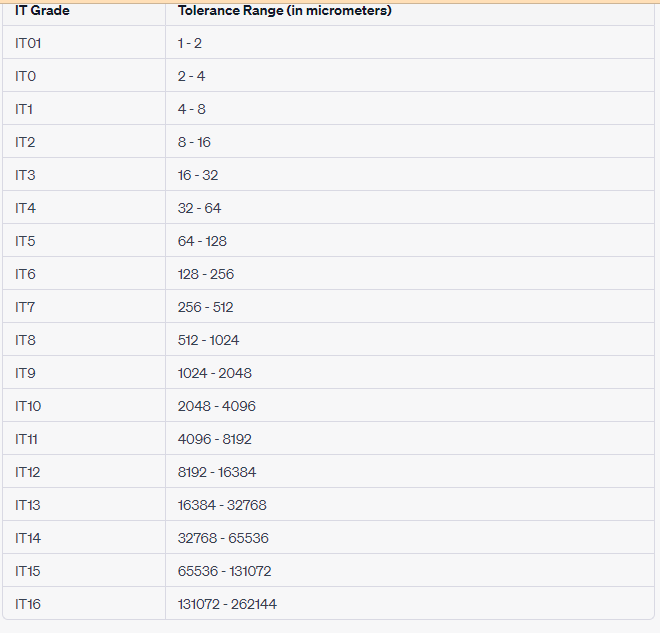
IT01, IT0, IT1, IT2, IT3, IT4, IT5, IT6, IT7, IT8, IT9, IT10, IT11, IT12, IT13, IT14, IT15, I16.
The IT Grades range from very tight tolerances (IT01) to wide tolerances (IT16), each defining specific tolerance zones.
Tolerance Zones
Tolerance zones refer to the allowable space or region around a nominal dimension within which the actual dimensions of a machined part are permitted to vary. These zones are defined based on the selected tolerance grade or IT Grade, as specified by international standards like ISO 286.
Maximum Material Condition (MMC)
It specifies that a part’s feature must have the largest possible size within the specified tolerance range. For example, a hole with MMC will be at its maximum allowed diameter, ensuring proper fit with mating components designed for that size.
Least Material Condition (LMC)
It specifies where a part’s feature contains the least material within the specified tolerance zone. For example, a shaft with LMC will have a minor allowable diameter, ensuring proper fit into mating components designed for that size.
2. CNC Machining Tolerance Chart & Specifications
Here below are the tolerance standard for the different tolerances.
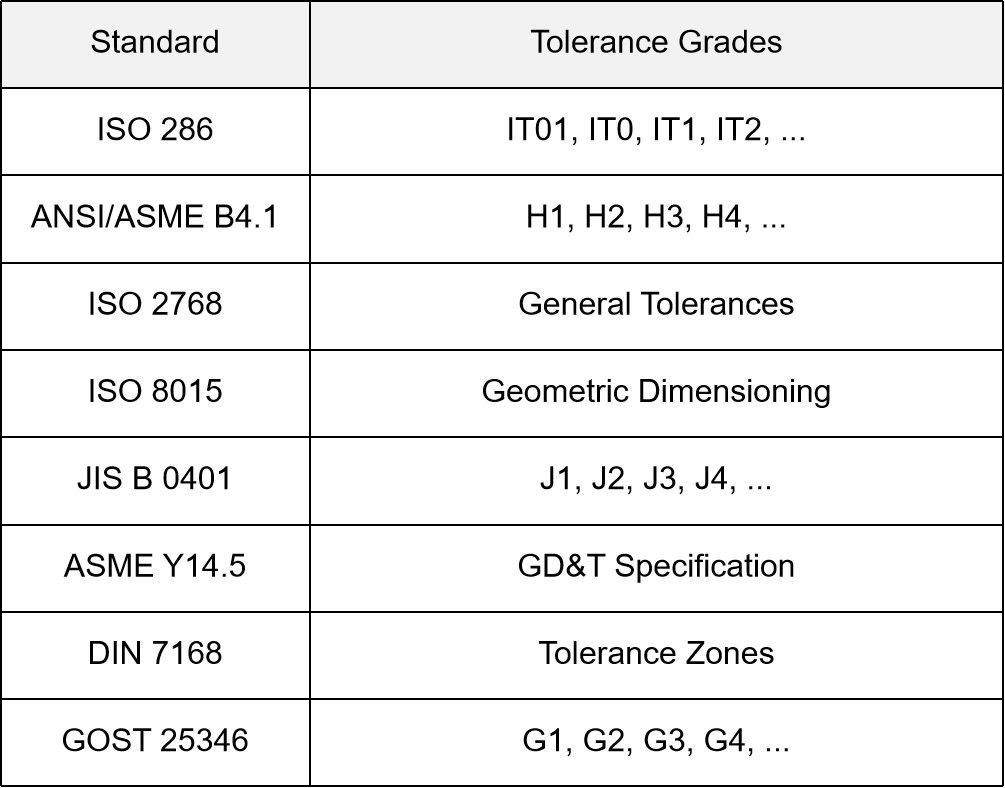
Tolerance Chart:
ISO 286:
ISO 286 is an international standard that defines tolerances and fits for ISO metric threads and hole and shaft systems. It ensures proper mating of mechanical parts and interchangeability.
Here is an example ISO 286 chart for basic shaft sizes and tolerance zones:

In this example, the chart provides information for basic sizes ranging from 5 to 30 with corresponding fundamental deviations, tolerance zones, preferred fits, fit types, and allowances. Please note that the actual ISO 286 chart is much more extensive and covers a broader range of sizes and tolerances. The presented values in this example are for illustrative purposes only and may not represent the actual values in the ISO 286 standard.
ANSI/ASME B4.1
ANSI/ASME B4.1 is a standard by the American Society of Mechanical Engineers (ASME) that provides guidelines for specifying tolerances and fits for cylindrical parts in engineering and manufacturing. It ensures proper mating and functioning of mechanical components in assemblies by defining acceptable variations in size and form.
A simplified representation of the ANSI/ASME B4.1 standard tolerance chart

Please note that the values in this chart are for illustrative purposes only and may not reflect the exact values from the official ANSI/ASME B4.1 standard. For precise tolerances, referring to the official ANSI/ASME B4.1 standard documentation or relevant engineering references is essential. The standard provides detailed information on tolerance classes and their corresponding tolerance values for inch-based linear dimensions.
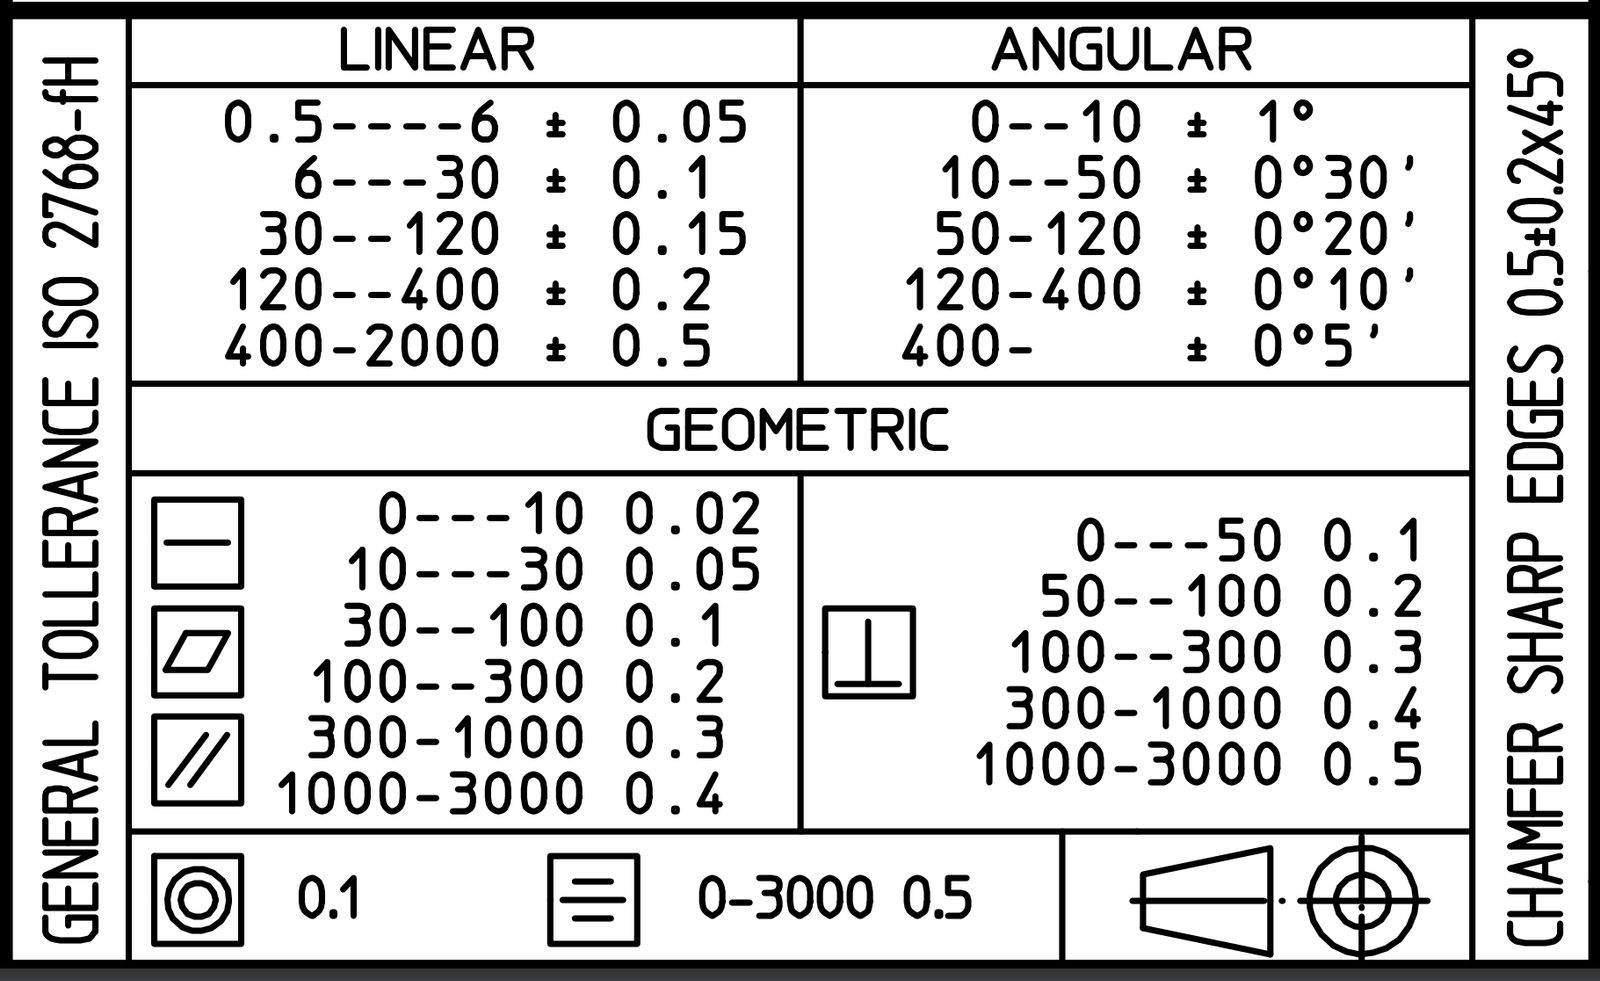
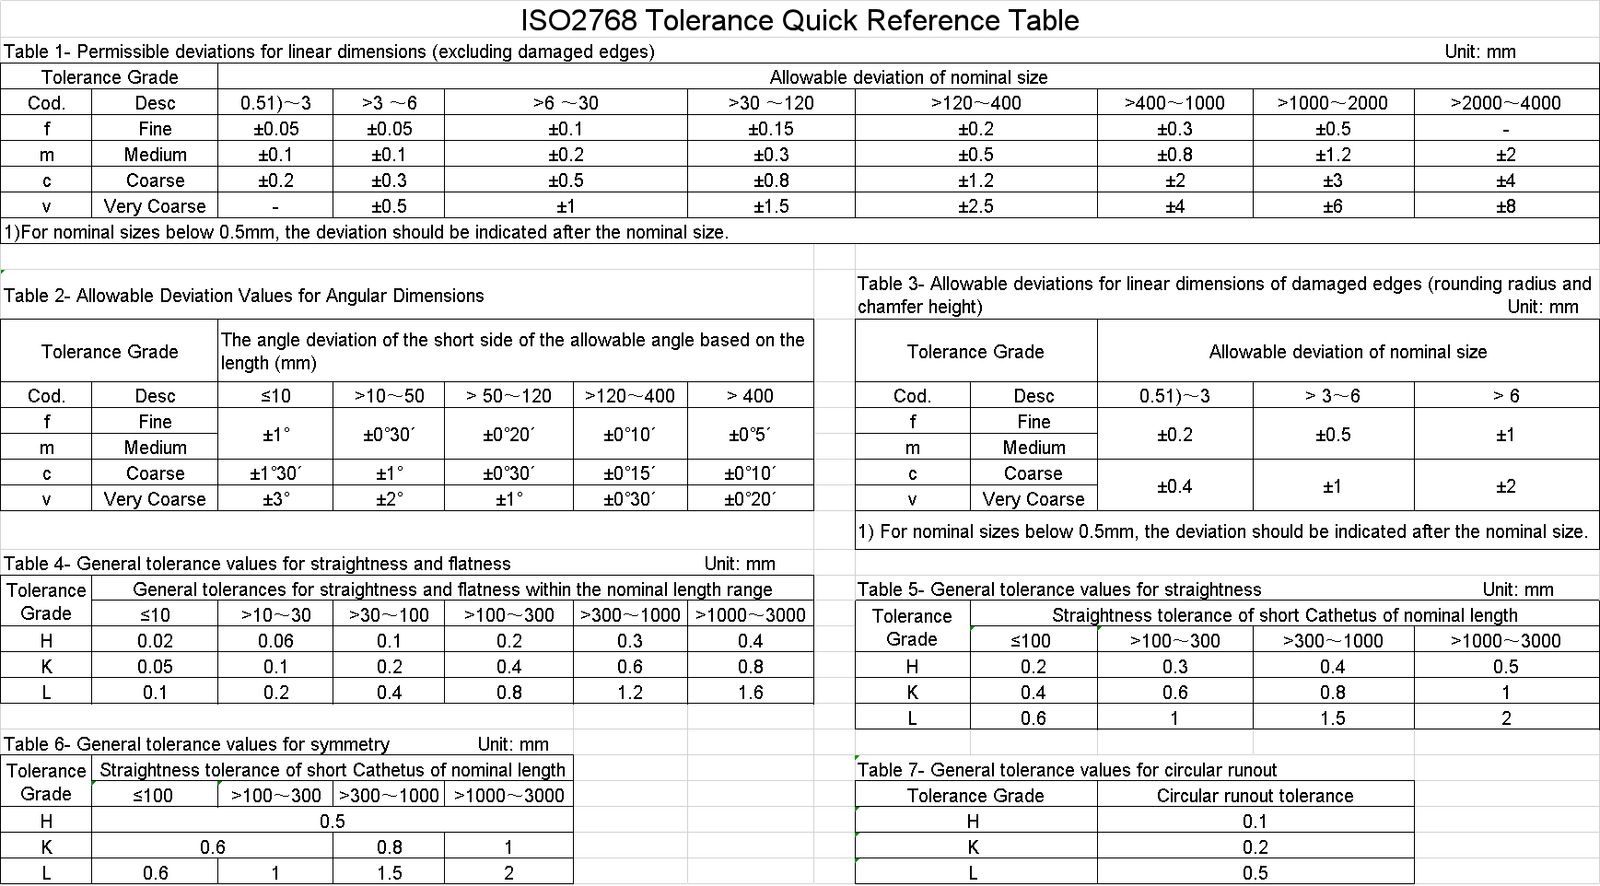
ISO 2768
What are the Common Concepts in CNC Machining Tolerances?
Understanding the terminology associated with CNC machining tolerances is essential for effectively communicating and interpreting engineering drawings and specifications.
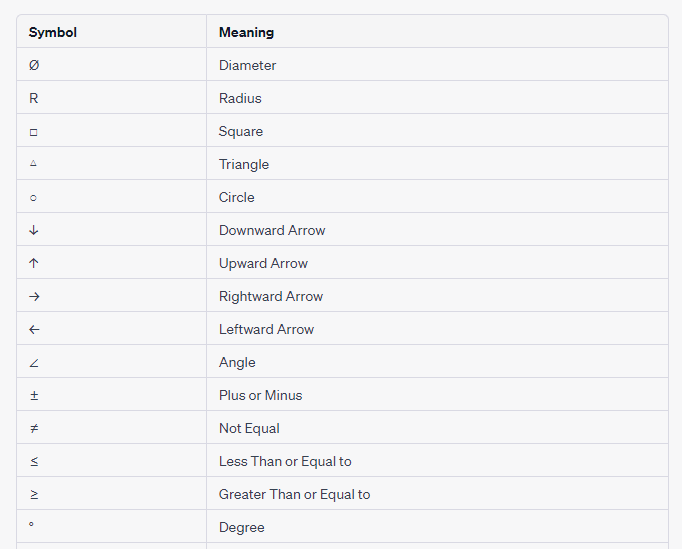
Dimension:
A dimension refers to a measurable length, width, or height of a feature on a part. It is typically specified in mechanical engineering or drawing and represents the desired feature size.
Tolerance:
Tolerance is the allowable deviation from the specified dimension. It defines the acceptable range determining tolerances within which the actual dimensions of a part can vary while still meeting the intended functionality and fit requirements.
Upper Limit (U/L) and Lower Limit (L/L):
The upper limit (U/L) represents the maximum allowable dimension, while the lower limit (L/L) represents the minimum allowable dimension. The actual dimension of the part must fall within this range to meet the specified tolerance.
Deviation:
Deviation refers to the difference between the actual measured dimension of a part and the desired or nominal value of the dimension. It indicates how much the actual dimension varies from the nominal value target dimension.
Plus-Minus Tolerance:
A plus-minus bilateral tolerance amount, or bilateral tolerance, is a tolerance specification where positive and negative deviations from the nominal dimension are allowed. It defines an acceptable range of general and bilateral tolerances on both sides of the nominal dimension.
Unilateral Tolerance:
In a unilateral tolerance, only one side of the nominal dimension has an allowable deviation. The unilateral tolerance is specified either as a positive or negative value, indicating the upper and lower limits or limitations of the unilateral tolerances’ acceptable range on one side of the dimension.
Geometric Tolerance:
Geometric tolerance specifies the allowable variation in a feature’s form, orientation, or position. It is represented by symbols, such as concentricity, parallelism, perpendicularity, and positional tolerance, to define the specific geometric relationships and constraints.
Fit and Clearance:
Fit refers to the degree of tightness or looseness between mating parts. It describes the intended relationship between two or more parts when assembled. Clearance, on the other hand, refers to the intentional gap or space between parts to ensure proper movement or assembly.
Surface Finish:
Surface finish refers to the texture or smoothness of the machined surface. It is often specified using a numerical value or a surface roughness symbol, indicating the acceptable level of roughness or smoothness for the part’s surface.
Datum:
A datum is a reference feature or point used to establish the coordinate system and control other features’ dimensional and geometric relationships. It is a basis for measurement and alignment during machining, inspection, and manufacturing processes.
By clearly understanding terms such as dimension, tolerance, deviation, fit, geometric tolerance, and surface finish, engineers and machinists can collaborate more efficiently, ensuring accurate and precise manufacturing of parts.
Factors to consider when choosing the Tolerances
1. Material tolerance
When choosing tolerances, the product’s raw material is a critical factor. Different materials have varying degrees of dimensional stability and susceptibility to thermal expansion, shrinkage, and other factors affecting their final dimensions. Understanding the material’s characteristics and potential variations helps select appropriate tolerances to ensure the component functions as intended.
2. When do You Need Tight Tolerances?
The required functionality of the component determines the level of precision needed. Some applications, such as precision instruments or aerospace components, demand tight tolerances to ensure accurate and reliable performance. On the other hand, less critical applications might allow for looser tolerances, saving production costs without compromising functionality.
3. Selection of Manufacturing Method
Different production methods have inherent limitations and capabilities when achieving tight tolerances. For example, CNC machining can achieve high precision, but 3D printing may restrict tolerances due to its layer-by-layer deposition. Understanding the capabilities of the chosen manufacturing method is essential in determining suitable tolerances.
4. Assembly and Functionality Requirements
Tolerances should also consider the assembly of multiple components. Parts that must fit or interact with other parts in an assembly require precise tolerances to ensure proper fit and functionality. The cumulative effect of tolerances within an assembly, known as stack-up, should be considered to avoid interference or excessive clearances.
5. Inspection
Consider the feasibility and cost of inspecting parts to ensure they meet the specified tolerances. Tighter tolerances might necessitate advanced inspection techniques, such as coordinate measuring machines (CMMs), which can add time and cost to the production process
6. Cost Control
Tighter tolerances generally increase production costs as they demand higher precision equipment, inspection, and tighter quality control. Balancing the desired precision with the project budget is essential. Evaluate the impact of tolerances on manufacturing costs and the product’s overall performance to find the optimal balance.
What factors can affect tolerances in CNC machining?
1. Machine Capability: High-end CNC machines can achieve tighter tolerances. Example: Precision CNC machining centers with advanced control systems.
2. Tooling Quality: Sharp and high-quality cutting tools lead to better dimensional accuracy. Example: Using new and well-maintained end mills.
3. Material Properties: Different materials have varying machinability, impacting achievable tolerances. Example: Aluminum typically allows for tighter tolerances than stainless steel.
4. Thermal Effects: Heat during machining can cause thermal expansion, affecting dimensions. Example: Using temperature-controlled environments to mitigate thermal effects.
5. Fixturing and Workholding: Proper fixturing prevents part movement and maintains tolerances. Example: Designing a stable fixture for accurate positioning.
6. Tool Deflection: Cutting tool deflection in deep or narrow features can affect tolerances. Example: Using shorter and sturdier tools.
7. Programming and Tool Paths: Optimized tool paths improve tolerance control. Example: CAM software with tool radius compensation.
8. Operator Skill: Skilled operators make real-time adjustments for tighter tolerances. Example: Expert operators optimizing machining parameters.
9. Inspection: Thorough inspection with precise measurement tools ensures compliance with tolerances. Example: Using CMMs or laser scanners for accurate measurements.
10. Post-Machining Processes: Secondary processes like heat treatment may impact the final dimensions. Example: Accounting for dimensional changes during heat treatment.
By managing these factors, CNC machining can achieve the desired tolerances, producing high-quality and precise components.
How to Select the Right Machine for Optimal Tolerance Control in CNC Machining?
Different machines have varying capabilities and characteristics that can influence the achievable precision.
1. Understand Tolerance Requirements
Start by thoroughly understanding the tolerance requirements of the parts to be machined. Consult the engineering drawings, specifications, or customer requirements to identify the specific tolerances needed for dimensions, features, and geometric tolerances. This understanding forms the basis for selecting a machine that can meet those requirements.
2. Machine Accuracy and Repeatability
Evaluate the accuracy and repeatability of potential machine options. Accuracy refers to how closely the machine can position the tool or workpiece to the desired location. Repeatability refers to the machine’s ability to return to a specific position consistently. Look for machines with documented accuracy and repeatability values that align with or exceed the required tolerances.
3. Dynamic Stability and Rigidity:
Consider the dynamic stability and rigidity of the machine. Dynamic stability relates to the machine’s ability to resist vibrations and maintain stable machining conditions.
Rigidity refers to the machine’s resistance to deformation or deflection during cutting forces. Machines with high dynamic stability and rigidity are better suited for achieving tight tolerances, as they minimize vibrations and maintain dimensional accuracy.
4. Spindle Runout and Tooling System
Evaluate the spindle runout and the tooling system of the machine. Spindle runout refers to the deviation in the concentricity of the spindle’s rotation. Higher spindle runouts can introduce variations in the machined dimensions. Look for machines with low spindle runouts to ensure precise tool positioning. Additionally, consider the tooling system compatibility and stability, as it can impact the overall machining accuracy.
5. Control System and Software Features
Examine the control system and software features of the machine. Advanced control systems with high-resolution feedback systems and precise servo motors offer better control over positioning and movement. Look for machines with user-friendly software that supports precise programming, tool path optimization, and error compensation capabilities.
6. Support for Measurement and Calibration
Consider the machine’s support for various measurement tools and calibration processes. Machines with built-in probing systems or integration capabilities for external measurement devices can aid in verifying dimensional accuracy and performing in-process inspections. These features facilitate the machine’s calibration to ensure it meets the required tolerances.
7. Machine Maintenance and Service
Evaluate the availability of maintenance and service support for the chosen machine. Regular maintenance and calibration are essential to maintain the machine’s accuracy and performance. Look for manufacturers or suppliers offering reliable technical support, availability of spare parts, and timely service to ensure long-term precision.
In terms of all, Selecting the right CNC machine according to the required tolerances is crucial for achieving precise and accurate machining results. Consider factors such as machine accuracy, repeatability, dynamic stability, spindle runout, control system features, measurement support, and maintenance services. By carefully assessing these considerations, manufacturers can make informed decisions and choose machines that align with their tolerance requirements, lower quality inspection costs, and ultimately enhance product quality and customer satisfaction.
How to Find the Right Tolerances in CNC Machining?
1. Consider the Use of Your Part
Identify Critical Features: Determine which features of your part are critical for its intended functionality. These features may require tighter tolerances to ensure proper fit and performance.
Non-Critical Features: Evaluate non-critical features that can tolerate looser tolerances without affecting the overall functionality. This approach can help optimize manufacturing costs while maintaining essential precision.
2. Look for a Reputable CNC Machining Company
Research and Reviews: Conduct thorough research and read customer reviews to find reputable CNC machining companies with a track record of delivering high-quality products and meeting tolerance requirements.
Capabilities and Expertise: Assess the company’s capabilities, equipment, and expertise in CNC machining. An experienced team with state-of-the-art machinery is more likely to achieve precise tolerances.
Communication and Collaboration: Choose a company that values clear communication and collaboration. Please discuss your project requirements in detail to ensure they understand your tolerance needs and can meet your expectations.
Finding the right CNC machining tolerances involves carefully considering the part’s purpose and critical features. Additionally, selecting a reliable CNC machining company with the necessary capabilities and expertise will play a crucial role in achieving the desired precision and ensuring the successful completion of your project.
Conclusion:
Tolerance standards are crucial in CNC machining to ensure precise and accurate components.
STC CNC Machining offers reliable CNC machining services tailored to your specific tolerance requirements. Our experienced team of engineers and technicians understands the importance of tight tolerances and works diligently to deliver high-quality results. Whether you need intricate parts or have specific tolerance specifications, we are committed to providing exceptional CNC machining services and solutions. Contact us today to discuss your project and discover how our services can help you achieve the extreme precision you need.

